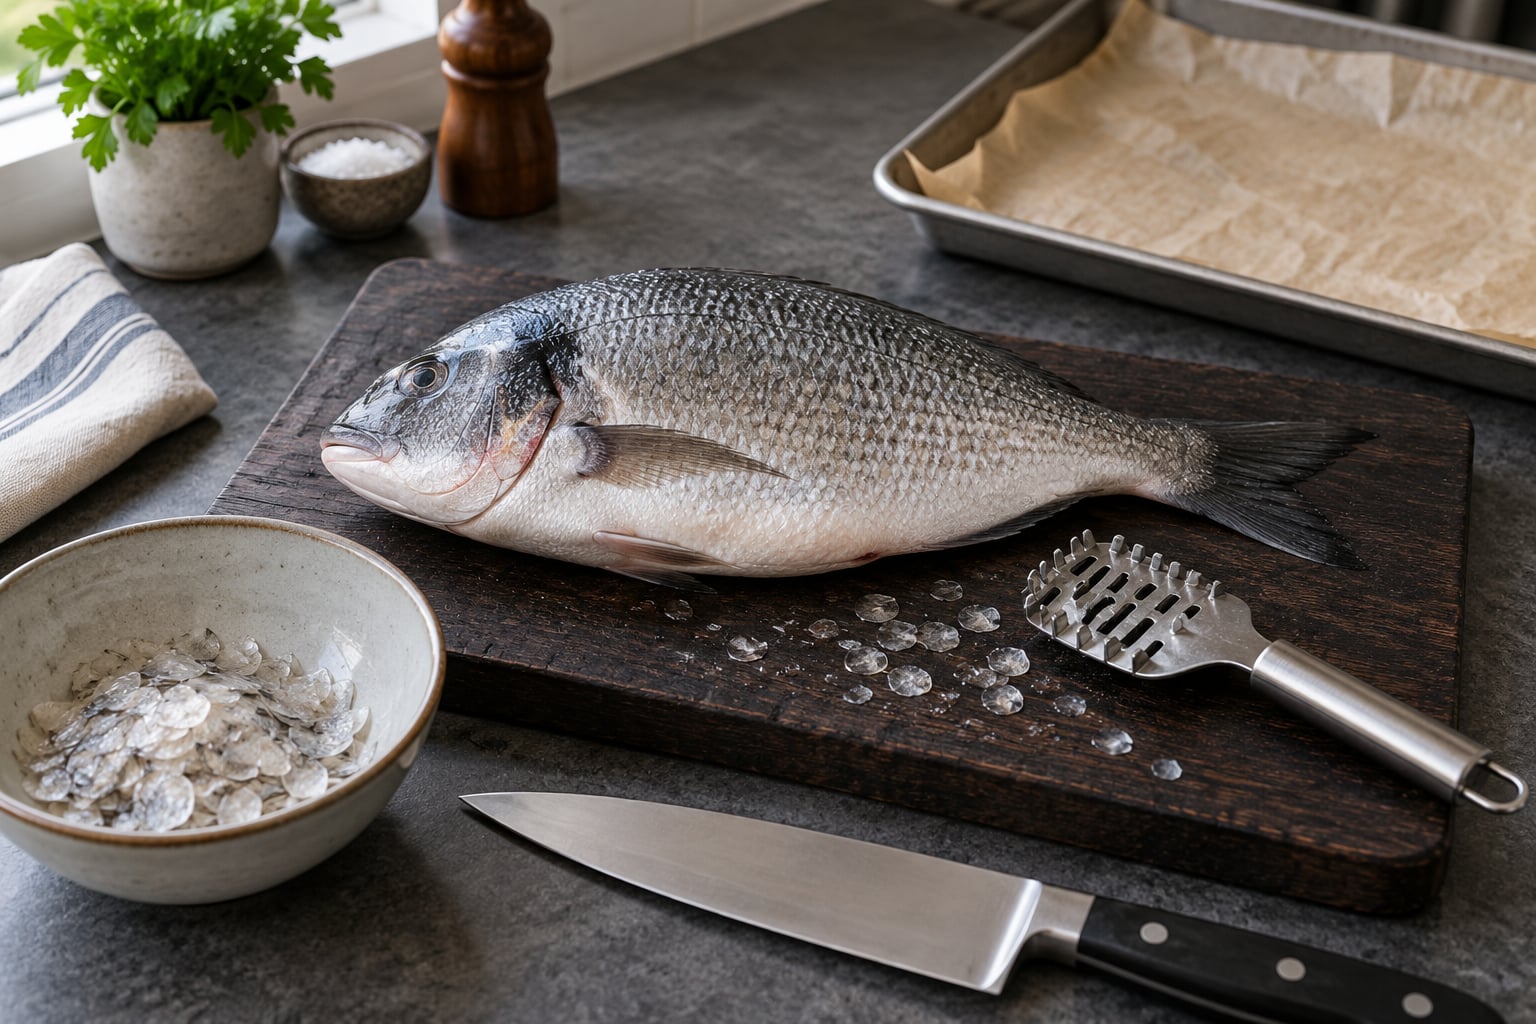
How to scale and gut a fish is a ten-minute job once you know the order of operations: scrape the scales off tail toward head against the grain, cut a shallow line from the vent up the belly, pull the innards out, scrape the dark kidney line along the backbone, and rinse. Most of the difficulty is not the technique. It is knowing which way the knife goes.
A whole fish bought fresh at a market stall is the cheapest seafood you will ever cook, and it is the most impressive. Scaling and gutting a fish needs a sharp knife, a spoon, and about fifteen minutes including cleanup. The mess is real, but it is contained if you set up properly first.
Two terms come up constantly, so define them now. The vent is the anal opening, the small slit on the underside of the fish partway back from the tail, and it is where the gutting cut starts. The bloodline is the dark strip running along the backbone inside the cavity; it is actually the kidney, and it is the source of a muddy, fishy taste if you leave it behind.
Work cold and work fast. Keep the fish on ice or in the fridge until you are ready, use cold running water rather than warm, and get it into the fridge again as soon as you finish.
Table of Contents
- What You Need
- How to scale and gut a fish without special tools
- Step-by-Step: How to Scale and Gut a Fish
- 1. Prepare the Fish and Work Surface
- 2. Remove the Fins and Scale the Fish
- 3. Make the Belly Cut
- 4. Remove the Entrails, Gills, and Tough Organs
- 5. Rinse and Check the Cavity
- 6. Store It or Cook It Right Away
- Common Mistakes
- Frequently Asked Questions
- Do I need to remove the gills before cooking a fish?
- Should I scale a fish before or after gutting it?
- How do I remove pin bones from a whole fish?
- What is the best way to remove fish scales without damaging the skin?
- How long can I store a freshly scaled and gutted fish?
- Can I freeze a fish after scaling and gutting it?
- Conclusion
What You Need
You need very little. Most of what people buy for this job is optional, and a spoon will do half of it.
- A sharp fillet or utility knife. A dull blade is the main reason beginners tear the belly instead of cutting it. If your knife drags rather than slices, it is too dull for this.
- A fish scaler, or a sturdy spoon. The scaler with a channel that catches scales as they come off is worth owning if you buy fish often. The back of a knife or the edge of a metal spoon does the same job in a pinch.
- Kitchen shears. For trimming fins and, later, pulling the gills. Market counters use scissors, not knives, for good reason. A spoon handle works for the gills if you have none.
- A cutting board. Preferably one you can rinse with a hose or run through a dishwasher afterwards. A rimmed baking sheet or a layer of newspaper is a fine stand-in.
- A bowl or deep sink for catching scales and innards, so nothing lands on the floor.
- Disposable gloves, optional but sensible with a slippery fish.
- Paper towels and a plastic bag or two for wrapping the innards and for the smell.
- Coarse salt for scrubbing the cavity membrane, though a thumb and a rinse under the tap does the job too.
- Refrigerator or cooler space. Ice if the fish is not cooking within the hour.
Set up before the fish comes out, not after. Lay the cutting board on a damp towel so it does not slide, drape a sheet of newspaper or open a large garbage bag underneath, and stand the fish over a bowl. Scales fly hardest on the first stroke, and that one detail saves most of the cleanup.
How to scale and gut a fish without special tools
If you own no fish equipment at all, the job still goes fine. Scrape with the back of your knife, the edge of a metal spoon, or the back edge of a butter knife held at an angle. Gutting needs a genuinely sharp blade, and there is no substitute for that. It is the one tool in this list worth spending money on.
Step-by-Step: How to Scale and Gut a Fish
1. Prepare the Fish and Work Surface
Inspect the fish before anything else. Look at the eyes: bright and clear means fresh, while a clouded or sunken eye means the fish has been sitting too long and the flesh will deteriorate quickly. Press the gill cover; the gills should be wet and red, not dry and grey.
Remove any packaging, absorbent pads, or twist ties completely. Rinse the fish briefly under cold running water to wash away surface slime and loose scales that would otherwise end up on your board.
Wash your hands and rinse your work surface with hot soapy water before you start. Cross-contamination is the one real food safety risk in this whole process, and raw fish is a raw animal like any other.
Put a damp towel under your cutting board, then a layer of newspaper or a large open garbage bag. Set a bowl beside the board. Keep the fish cold: if you are not working for the next ten minutes, leave it on ice.
2. Remove the Fins and Scale the Fish
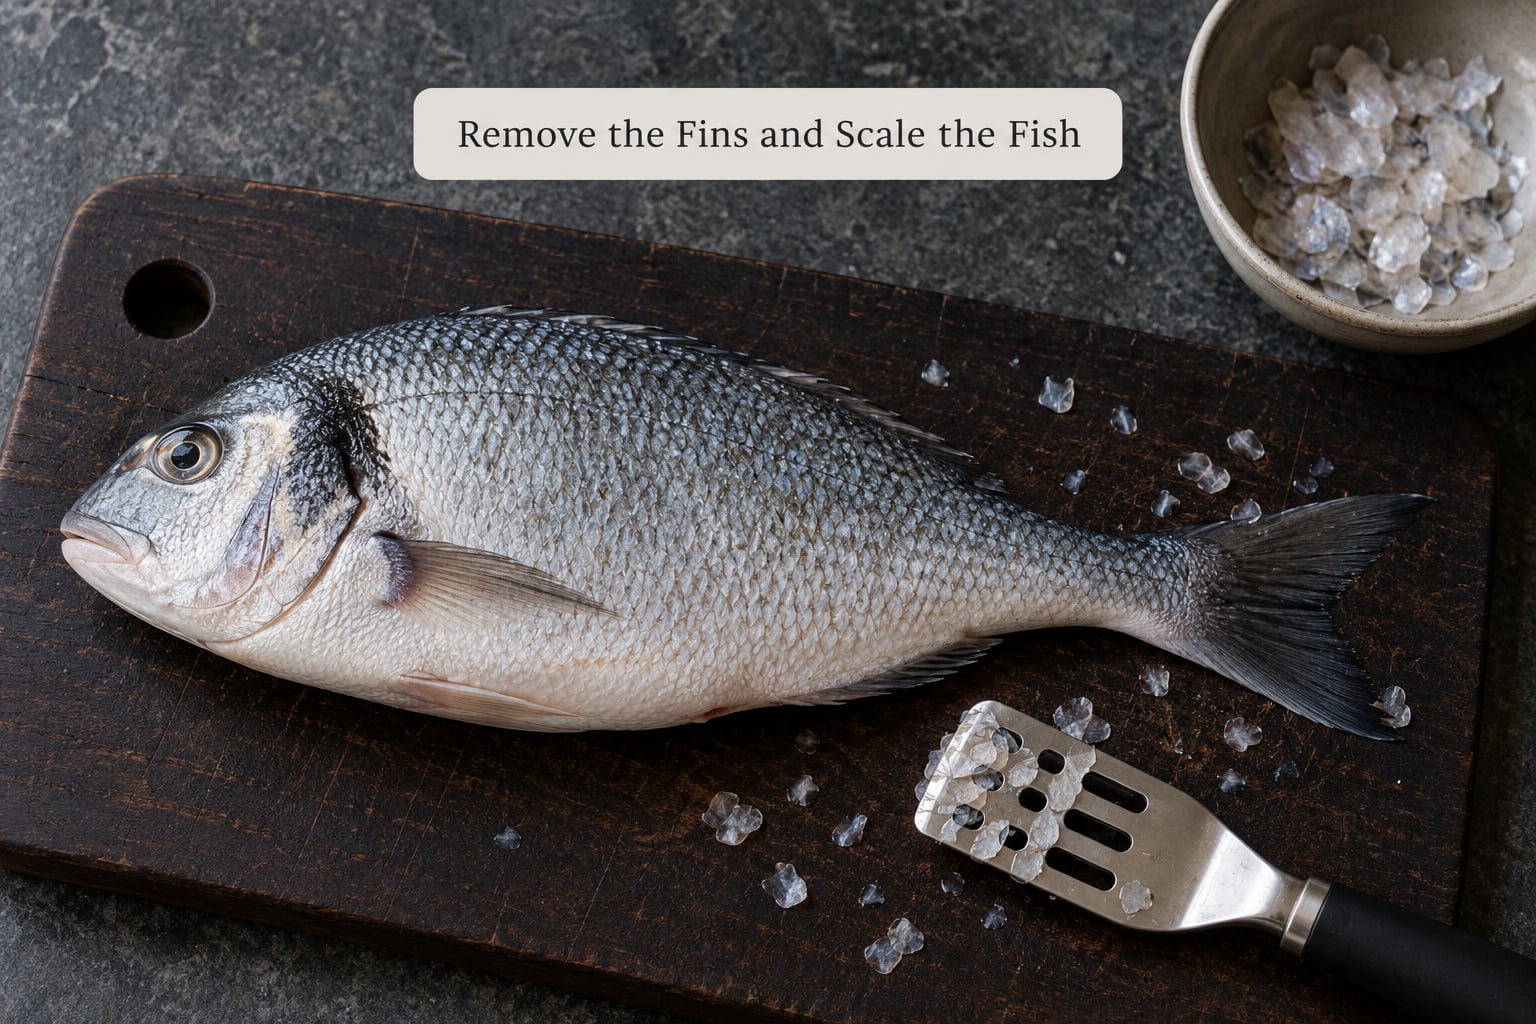
Trim the sharp fins first. The dorsal fin, the pectoral fins, and the tail all carry spines that will find your hands later in the process. Snip the dorsal and pectoral fins with kitchen shears, cutting close to the body.
You can leave the tail on. Hold the very tip of it, beyond the fin, so your hand is as far from any spine as possible. A wet fish is a slippery fish, and the tail is the one place you can grip firmly.
Scrape firmly from the tail toward the head, against the grain of the scales. Short, firm strokes work better than long lazy ones. Going head-to-tail pushes scales under other scales instead of lifting them off, and it is the single most common reason a first attempt takes twice as long as it should.
Pay attention to three trouble spots: the collar behind the gills, the area just in front of the tail, and around the fin bases where scales hide underneath. Many beginners do everything else properly and then find scales on the plate at dinner.
Rinse the fish under cold running water while you do a second light pass. The scales will wash off rather than brush off. You know you are done when the skin feels smooth under your fingertips with a fingertip run against the grain, with no grit at all.
3. Make the Belly Cut
Lay the fish on its side, belly down, head facing away from you. Locate the vent, the small opening on the underside partway back from the tail. From there, insert the tip of your sharp knife just above the vent.
Cut from the vent toward the head, staying shallow. You are cutting through skin and belly wall, not through the organs beneath, so keep the blade nearly flat and use the outside of the blade to control depth. A firm slice through skin, then a series of short sawing motions along the belly, opens the cavity without slicing into the intestines.
Somewhere around the level of the pectoral fins, stop. You do not need to run the cut all the way to the gills, and opening the belly wider than needed ruins the look of a whole-fish cook and costs you cheek meat. A cut just wide enough to reach the organs is the goal.
If you want the fish to stay whole for grilling, there is an alternative. Cut up under the gill cover to the bone, then around it, and pull the innards out through the gill opening from the head end. The belly stays nearly closed and the fish holds together in the oven. It takes steady hands, and it is worth learning once you have gutted a few the normal way.
4. Remove the Entrails, Gills, and Tough Organs
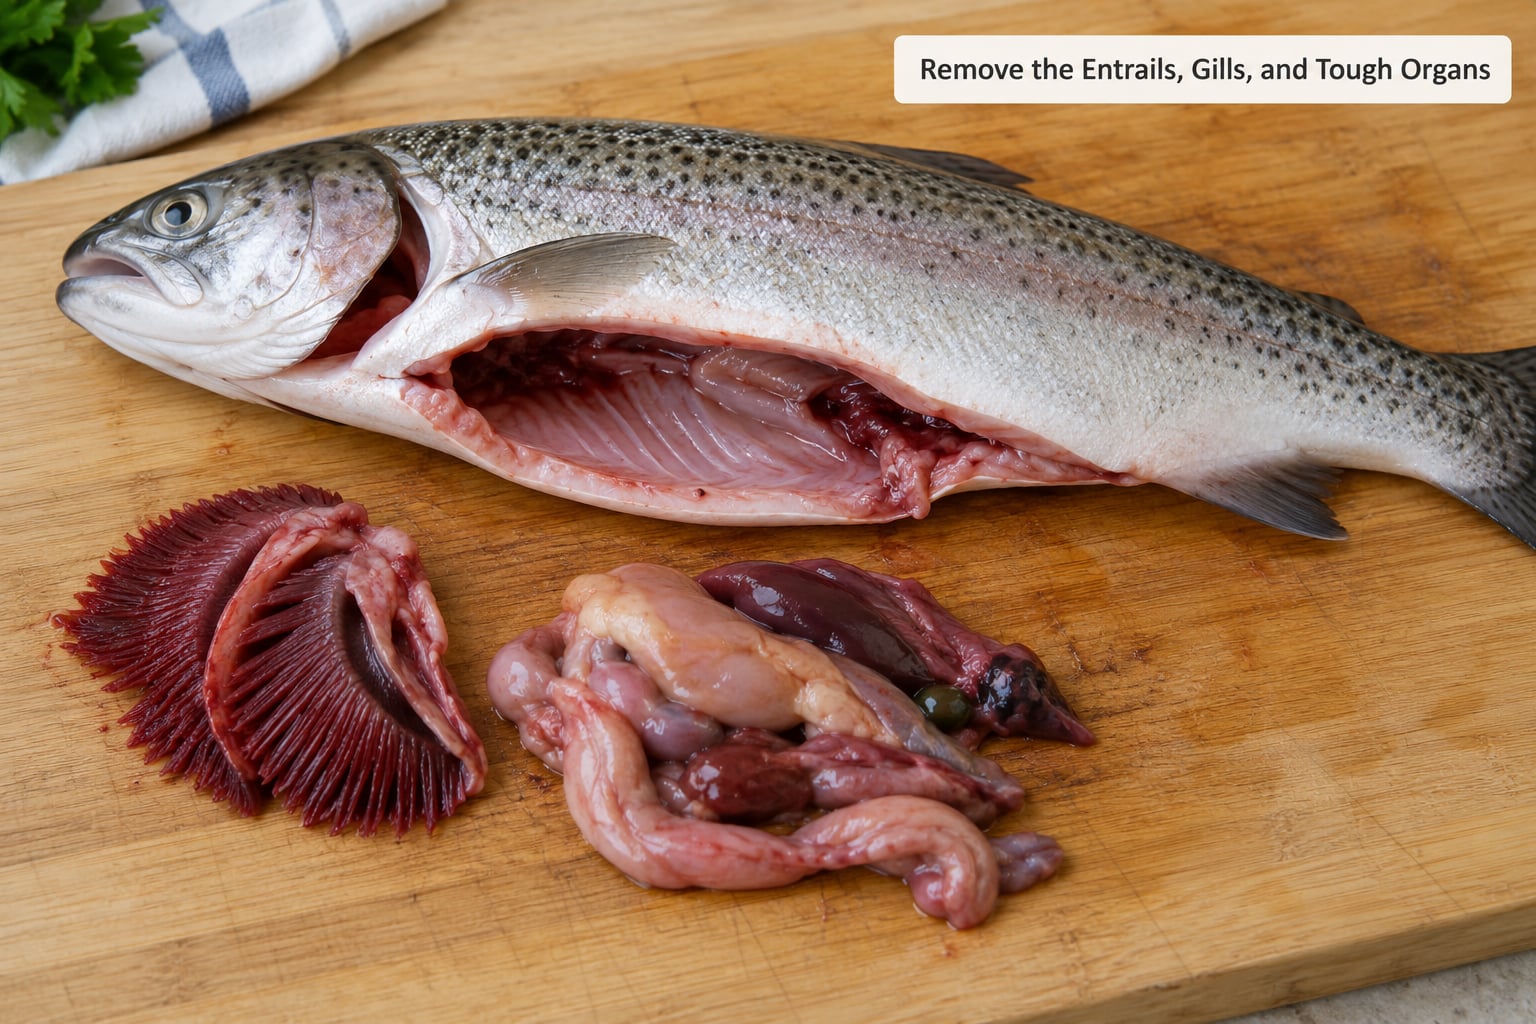
Loosen the innards with your fingers or the handle of your spoon, then pull the whole mass out in one piece. Work from the front of the cavity toward the vent so nothing tears and leaves fragments behind. If the intestines stretch and resist, cut them at the vent rather than yanking.
Drop the innards straight into the bowl you set out. A gutted fish produces a very large volume of material relative to the fish itself, and double-bagging it before it reaches the bin is the difference between a normal evening and a fishy kitchen.
Now deal with the remaining organs. Pull the gills out with your fingers or kitchen shears; they sit in a hood at the back of the head and come away easily once the belly is open. Scrape away any pale fatty tissue and the dark membrane lining the cavity walls. A rock salt scrub is the blunt way to do this, but your thumb works too.
Then take the dark line running along the top of the backbone. That is the kidney, not a clot of blood, and it tastes muddy if you cook it. Scoop it out with the edge of a spoon or scrape it with a thumbnail. It runs the whole length of the spine, all the way under the head, so take your time.
Work gently. The back of the fish is the most fragile part of the animal, and pressing hard with a spoon is how you crush the meat underneath.
5. Rinse and Check the Cavity
Rinse the inside of the cavity with cold running water, running the water from the head end through the belly opening so it carries any fragments out. Turn the fish and let the water drain. Do this two or three times until the water runs clear.
Look inside with a flashlight or under a bright lamp. Check for a yellow or dark egg mass, remaining membrane, red tissue along the spine, and any loose rib or pin bone you may have exposed. Remove anything you find with your fingers or the tip of the knife.
Pat the fish dry inside and out with paper towels. This step is easy to skip and it matters: a dry surface browns and crisps, a wet one steams and the skin goes soft. Experienced cooks dry every fish they grill for exactly this reason.
6. Store It or Cook It Right Away
Cooking immediately is always the best option. If you cannot, refrigerate the cleaned fish on a plate or in a covered container at 40°F or below, and use it within one to two days of purchase. Keep it on the lowest shelf or in a sealed box so the smell does not spread to everything else in the fridge.
For longer storage, freeze it. Lay the fish flat in a freezer bag or wrap it tightly, press out the air, and label it with the date. Thaw it in the refrigerator overnight, never on the counter.
Whichever route you take, cook fish to an internal temperature of 145°F (63°C), measured in the thickest part near the backbone. That is the USDA minimum safe internal temperature for fish, and it is the number to hold yourself to when in doubt.
Common Mistakes
Using a dull knife. A dull blade skids, tears skin, and slips toward your fingers. Sharpen it before you start, and if it still drags, use a different knife for the belly cut.
Scraping from head to tail. This pushes scales beneath scales. Always go tail to head, against the grain, with the fish held by the tail tip.
Cutting too deep in the belly. Slice through skin first with a firm stroke, then keep the blade shallow and flat. If you puncture the intestines, the cavity contaminates and rinses cloudy for a long time.
Opening the belly wider than you need. Stop at the pectoral fins. A wide opening spills fat, dries the flesh, and looks bad on a whole-fish presentation.
Leaving the gills and the kidney line. Both cause a stronger fishy flavor than the flesh itself. Pull the gills, then scrape the spine clean.
Skipping the cavity rinse. Even a clean-looking cavity holds fragments. Rinse until the water runs clear, then check with a flashlight before you dry.
Letting the fish sit out. Keep it cold from the market to the pan. Two hours at room temperature is the limit, and one hour in hot weather.
Scaling without a plan. Board on a damp towel, newspaper or garbage bag underneath, bowl alongside. Scales end up on walls, ceilings and floors otherwise, and that is the complaint nearly every beginner posts about.
Cleaning the smell off your hands, board and knife afterwards takes about two minutes. Wash with hot soapy water first, then wipe the knife and board with a cloth dampened with white vinegar or lemon juice. Trash the gloves and the paper lining rather than rinsing them into the sink.
Frequently Asked Questions
Do I need to remove the gills before cooking a fish?
Not strictly, but most cooks pull them anyway. The gills sit in a hood behind the head, and trapped blood and mucus in them give a finished fish a stronger, muddier flavor than the flesh alone. Removing them takes five seconds with kitchen shears or your fingers once the belly is open. Leave them in if you are cooking fish heads or stock, where they add body to the broth.
Should I scale a fish before or after gutting it?
Either order works, but scale first. Scaling is messier and drier work, so doing it before the cavity is open keeps water and loose organs out of your way, and it stops scales from sticking to a wet fish. The one exception is a fish you bought already scaled at the market counter, where gutting first saves you a step.
How do I remove pin bones from a whole fish?
Pin bones sit in the thick flesh near the backbone, and no amount of scaling or gutting removes them. Run your fingers along the backbone from tail to head under cool light and feel for the thin, curved bones. Pull them out with needle-nose pliers or fish bone tweezers, following the curve rather than yanking straight. They are most troublesome in round, oily fish like salmon, carp and yellowtail.
What is the best way to remove fish scales without damaging the skin?
Hold the fish by the tail tip and scrape from tail toward head against the grain with short, firm strokes. Use a fish scaler with a channel that catches the scales, or the back of a knife or a metal spoon if you have neither. Rinse as you go and finish with a fingertip run against the grain. If you are working on expensive delicate fish, scaling with the back of a blade avoids bruising the flesh underneath.
How long can I store a freshly scaled and gutted fish?
Refrigerated at 40°F or below on a plate or in a covered container, a cleaned fish keeps for one to two days from the day you bought it. Keep it on the lowest shelf or boxed up, because the smell travels. For longer, freeze it flat in a sealed bag with the air pressed out and cook from thawed, never straight from frozen unless you plan to poach it.
Can I freeze a fish after scaling and gutting it?
Yes, and it is the standard way to store a cleaned fish. Freeze it as soon as you finish, rather than leaving it in the refrigerator for a day first. Pat the cavity dry, lay the fish flat, press the air out of a freezer bag, and label it with the date. Thaw overnight in the refrigerator and cook within a day of thawing for the best texture.
Conclusion
Learning how to scale and gut a fish comes down to four moves in the right order: scale from the tail toward the head against the grain, cut a shallow line from the vent toward the head, pull the innards and gills and scrape the kidney line off the backbone, then rinse until the water runs clear and dry the fish inside and out.
Start with the setup rather than the knife. Board on a damp towel, newspaper or a garbage bag underneath, bowl beside it. Then make your first pass tail to head, keep the belly cut shallow, and rinse the cavity twice before you dry it and get it back into the fridge or onto the heat.