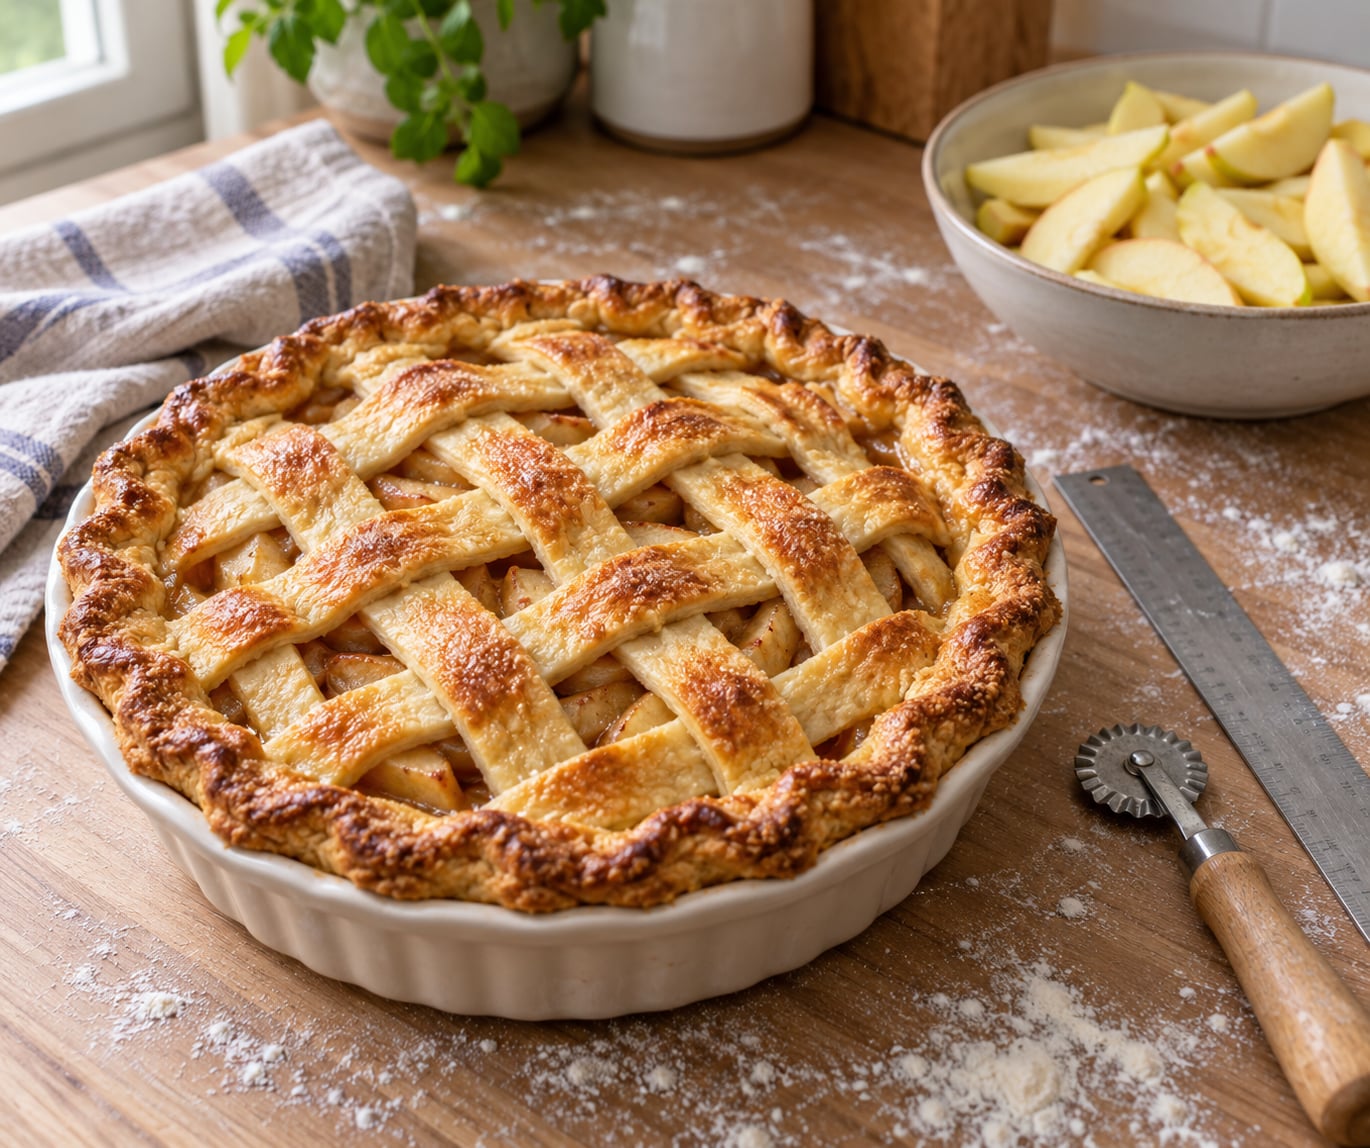
A lattice pie crust is a top crust rolled out, cut into even strips, and woven over the filling in an over-under pattern so the fruit shows through. It is decorative, not structural, which is good news for beginners: it bakes in the same time as a solid top and does not need sealing. The real job is keeping the dough cold enough that strips will not shrink or tear in your hands.
Give yourself about an hour, plus an hour of chilling time the day before if you can. You need a double-crust dough, a 9-inch pie plate, and a filling you have already made and cooled. If you have never rolled a crust at all, practice on a single-crust pie first; weaving adds patience, not skill you are missing.
Here is the sequence I follow, and the mistakes that trip people up most.
Table of Contents
- What You Need
- Dough, by cup and metric
- Filling
- Tools
- Oven and temperature
- Step-by-Step: How to Make Lattice Pie Crust for Beginners
- 1. Make and Chill the Pie Dough
- 2. Roll the Bottom Crust and Fill the Pie
- 3. How to Make Lattice Pie Crust Strips That Stay Put
- 4. Weave the Lattice Without Tears
- 5. Trim, Fold, and Crimp the Edges
- 6. Brush, Vent, and Bake the Pie
- 7. Let the Pie Rest for a Clean Slice
- Common Mistakes
- Frequently Asked Questions
- Can I use store-bought pie dough to make a lattice top?
- Do the lattice strips need to be exactly the same width?
- What is the easiest weaving pattern for a first pie?
- How do I keep the lattice strips from slipping while I weave?
- Should I brush a lattice crust with egg wash or milk?
- How can I tell when a lattice pie crust is baked?
- Conclusion
What You Need
For one 9-inch lattice-topped pie you need a two-crust pie dough, a filling that has cooled, and about a quarter of an hour at the counter once you start assembling. Most beginners get the dough wrong before they get the weave wrong, so measure everything by weight if you can.
Dough, by cup and metric
- 2 cups (250 g) all-purpose flour — spooned and leveled, not packed
- 1 teaspoon (6 g) fine salt
- 1 cup (227 g / 8 ounces) cold unsalted butter, cut into cubes
- About 1/2 cup (120 ml) ice water, plus more a tablespoon at a time
That makes two 9-inch crusts: one bottom, one top. The top gets rolled a little thicker than the bottom because strips have to survive being lifted and folded back.
Filling
Whatever you are using — apple, cherry, blueberry, peach, rhubarb. Two things matter here and neither is the recipe. The filling must be cold, and it must not be runny, because a lattice leaks more than a solid top does.
Thickening a thin fruit filling with a tablespoon or two of cornstarch is the standard fix. Chill it in the fridge until it stops steaming, then scrape it into the shell straight from the cold bowl.
Tools
- Rolling pin, and a pastry cloth or sheet of parchment paper larger than your dough
- Ruler and a sharp knife, or a fluted pastry/pizza wheel
- 9-inch pie plate (glass, ceramic or metal) and a baking sheet
- Pastry brush and a small bowl for the pie wash
- Dry flour for the work surface, plus a cup of ice water for patching tears
Oven and temperature
Bake at 350°F (177°C) for 50 to 60 minutes, then raise the heat to 400°F (204°C) for the last 8 to 10 minutes to set the crust and brown the top. Put the pie plate on a preheated baking sheet if you want a crisper bottom. Loosely tent foil or a pie shield over the edges once they look set, about 25 minutes in, so the rim does not burn before the filling is done.
If you want a genuinely crisp bottom, blind bake the empty shell with weights at 375°F (190°C) for 15 minutes, remove the weights, and bake 5 minutes more before filling. It adds 20 minutes and it is the single biggest upgrade to a bottom crust.
Step-by-Step: How to Make Lattice Pie Crust for Beginners
1. Make and Chill the Pie Dough
Whisk the flour and salt together, then work the cold butter in with your fingertips until the mixture looks like coarse crumbs with a few pea-sized butter pieces left. Pour in about half the ice water and stir with a fork, adding the rest a little at a time. The dough should hold together when you pinch it but still break apart easily in your hand.
Do not knead. Thirty seconds of stirring and a press into a flat disk is enough; over-handling warms the butter and makes the crust tough. Wrap it and chill at least 30 minutes, an hour if your kitchen is warm.
Why the chilling is not optional: cold butter keeps its solid shape and the dough stays cold, so the butter steams in the oven and lifts the layers apart. Warm butter melts into the flour, and you get a flat, crumbly, short-baked shell instead. Every problem in the next steps traces back to dough that got warm.
2. Roll the Bottom Crust and Fill the Pie
Roll the first dough disk to about 1/8 inch thick and roughly 12 inches wide. Lift it by the edges, drape it over the tilted pie plate, and ease it down the sides with your hands so gravity does the work. Press out any big folds from the bottom, then trim the overhang with a knife and leave it about 1 inch past the rim.
Crimp that overhang to the rim now, using the tucks-and-pinch method, so the shell holds its shape while you weave. Fill the cooled filling to within about three-quarters inch of the top.
Two checks before you move on: the shell should be cold to the touch, and it should not have been stretched into the dish. A stretched bottom shrinks and slumps in the oven, and a warm shell melts the butter in the strips you are about to lay on it.
3. How to Make Lattice Pie Crust Strips That Stay Put
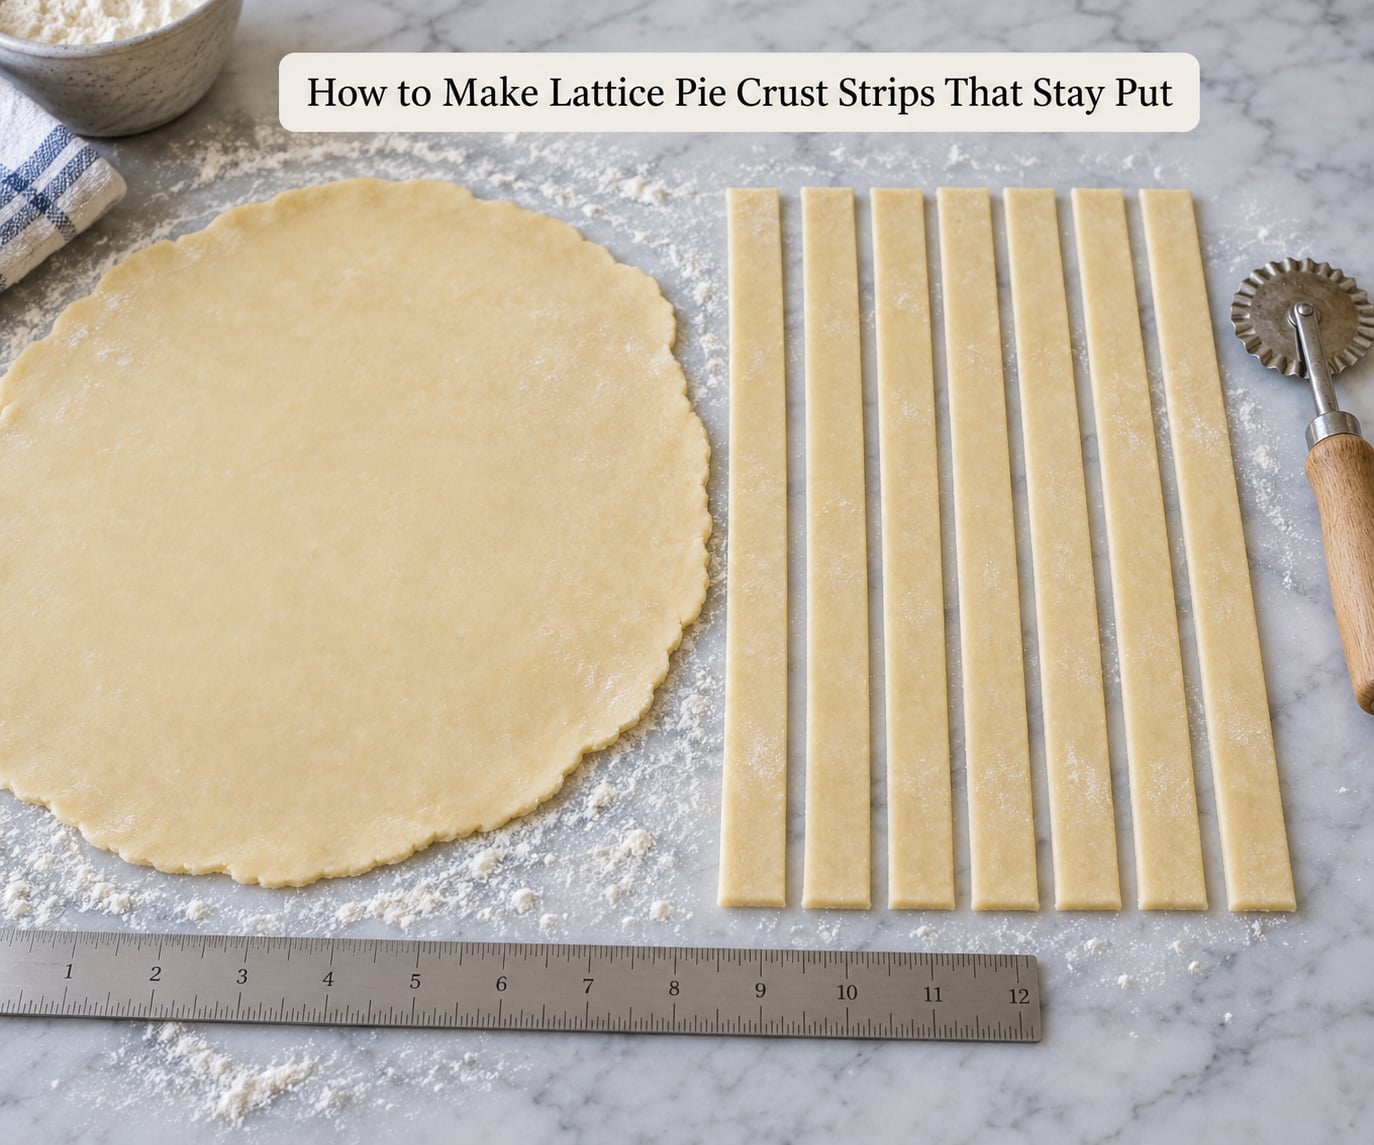
Roll the second dough disk to about 1/4 inch thick — roughly twice the thickness of the bottom crust. Measure with the ruler and cut strips 1 inch wide, running the knife straight down the sheet rather than sawing back and forth, which compresses and drags the edges.
A fluted wheel gives you a decorative edge and does the same job. Whichever you use, keep the cuts parallel: use the ruler as a guide, and move it rather than eyeballing the widths.
Lay the strips on the parchment or cloth as you cut them, dust lightly with flour, and they will stay separate. If any strip is narrower than the rest, trim it to match or save it for patching cracks. Working fast matters more than precision here; a sheet that sits on the counter while you finish the last strip is already softening.
How many strips do you actually need? For a first attempt, use 4 to 6 wide strips. Baking Bites puts the range at 4 to 20 and is right that the count is a free choice, but fewer and wider strips means fewer fold-backs and fewer chances to tear something. Go to 8 to 10 narrower strips once this feels routine.
4. Weave the Lattice Without Tears

Lay every other strip across the pie, spacing them evenly, so the first, third and fifth lie directly on the filling. Lay them all the same direction, long edge to long edge, and do not press them down hard yet.
Now fold those strips back toward the center, one at a time, in a gentle arch. They should rest on the filling in a single layer, not hang off the far rim. This is the moment beginners tear dough, so lift each strip from underneath with two dry hands instead of pinching an edge.
Lay one strip across the pie perpendicular to them, directly on top of the folded arches. Unfold the folded strips back over it. That single down-across-up cycle is the whole weave, and the over-under alternation is what creates the pattern.
Repeat with the remaining strips until the filling is covered, keeping gaps about a quarter inch wide so steam can escape. Leave at least 1 inch of overhang on every strip at the rim; if you trimmed them flush, the weave will be impossible to seal.
If a strip breaks or falls apart, dab the broken ends with ice water, press them together, and patch the gap with a spare strip piece. If the whole sheet has gone soft, put the pastry cloth, strips and all, in the fridge for 10 minutes. Cold dough is recoverable; warm dough is not.
5. Trim, Fold, and Crimp the Edges
Trim the overhang to about 1 inch with a sharp knife, cutting straight down so you do not pull the weave apart. Do not trim the strips flush with the rim — that extra length is what you need to seal the edge.
Tuck the strip ends down and under the filling and inside the bottom crust rim, so the filling cannot escape as it bubbles. Then fold the top crust overhang over the pie plate rim, turn it under itself, and pinch it into the bottom crust.
Work around the pie once for a continuous seal. Then crimp it: press the heel of your hand into the edge and pinch with the thumb and forefinger of your other hand, or press with a fork in even intervals. Keep crimping the whole way around even if the first few look uneven — the pie reads as hand-made, not as a mistake.
You do not have to press the lattice strands down or glue them together. They set on contact as the pie bakes.
6. Brush, Vent, and Bake the Pie
Brush the lattice with a pie wash. One egg beaten with a tablespoon of milk or water gives the deepest golden shine; heavy cream works and is more forgiving if you are squeamish about raw egg; equal parts honey and water, warmed in the microwave for 10 seconds to combine, gives a glossy, slightly softer finish. Sprinkle coarse or turbinado sugar over the top for sparkle and a bit of crunch.
Small holes are optional on a lattice — the gaps in the weave already vent the steam. If your strips sit close together, poke a few holes anyway with a fork or a skewer.
Chill the assembled pie 15 to 20 minutes if you have time, then bake at 350°F (177°C) on a preheated baking sheet. Check at 50 minutes: the filling should be bubbling thickly and the bottom crust should be brown at the edges. If the rim is dark but the filling is still bubbling hard, move it to the lower rack or cover the edges with foil.
Turn the oven up to 400°F (204°C) for 8 to 10 minutes at the end, until the lattice is deep golden and the juices run thick, not watery. Then cool it. Do not cut it while the filling is hot, no matter how good it smells.
The simplest ways to tell a lattice crust is baked: the strips are uniformly golden on the top and darker at the edges, the visible fruit has collapsed down from its mound, and a spoon pressed into the center comes up thick rather than thin and glossy. If the juices bubble lazily, give it 5 more minutes.
7. Let the Pie Rest for a Clean Slice
Set the pie on a wire rack and wait at least 2 hours for a fruit pie, longer if you can wait 3 or 4. The starches in the filling and any thickener you used set as they cool, and a slice cut from a hot pie is half liquid running out of the dish.
Nobody tells you this and it matters more than the weave. Cutting early is the most common way a good lattice pie gets ruined after two hours of work.
A fully cooled pie keeps at room temperature, loosely covered, for about 2 days. After that, refrigerate it covered for up to 3 to 4 days, and let the slice sit out 15 minutes before eating. Warm it in a 325°F (163°C) oven for 10 minutes if you want the crust crisp again.
Common Mistakes
Almost every failed lattice comes down to heat, hurry, or thin strips. Here is what went wrong and what to change.
- The strips shrank and curled. Your dough was warm, or you stretched it while placing it. Work in short bursts, refrigerate anything that gets soft, and lay strips down instead of pulling them across the filling.
- Strips broke during the fold-back. They were rolled too thin. Aim for a quarter inch, which is visibly thicker than the bottom crust, and lift from underneath with flour-dry fingers rather than pinching an edge.
- The bottom is soggy. Underbaked or unfilled too early. Blind bake the shell with weights, or set the filled pie on a preheated baking sheet.
- The rim burned before the filling cooked. Tent foil or a pie shield over the edges after about 25 minutes. Pie shields cost a few dollars and save a pie.
- Filling leaked through the lattice. The filling was too loose and too warm. Chill it hard, thicken it with cornstarch if needed, and fill no higher than three-quarters inch.
- Dough cracked at the rolling stage. Usually too little water, not too much. Start with less ice water than you think you need and add it a tablespoon at a time.
- The weave looks uneven. Your strips were not parallel. Measure against a ruler every time, and check spacing by standing over the pie and looking straight down.
- The bottom slumped into the plate. You stretched the crust as you pressed it into the dish. Ease it down the tilted plate and let the dough do the fitting.
A few habits worth picking up before you start: work on parchment or a pastry cloth so you can lift the whole sheet into the fridge mid-weave; keep a bowl of ice water next to you for patching; and flour the surface generously, because sticky dough is far more likely to tear than floured dough.
If your dough keeps cracking or you over-handle it out of nerves, switch to a more forgiving recipe. A sour cream dough hydrates itself, so it tolerates extra handling instead of turning tough. Adding a teaspoon of vinegar works the same way: the acid slows gluten development and keeps the crust tender.
That brings up a term you will see. The 3-2-1 dough method just describes the shape of a basic pie dough — roughly three parts flour to two parts fat to one part salt, by weight. Treat it as a proportion to eyeball, not a scale to follow literally, because a full third of the weight as salt would make a crust you could not eat. The practical version for a two-crust pie is the one above: 2 cups of flour, a cup of butter, and a teaspoon of salt.
If you truly cannot get the weave to work, skip it. A solid top crust with cut vents, a checkerboard of cut-out squares, or a rustic rolled and brushed edge all look deliberate, and none of them are a failure. Many bakers I know use the checkerboard for weeknight pies and save the lattice for holidays.
Frequently Asked Questions
Can I use store-bought pie dough to make a lattice top?
Yes, and for a first attempt it is the easiest way to learn the weave. Buy dough sold in discs, keep it cold, and roll the second disc to about a quarter inch thick before cutting strips. The dough tends to be slightly softer than homemade, so work in short bursts and chill the sheet midway if the strips start to feel tacky.
Do the lattice strips need to be exactly the same width?
They need to be close, not identical. Even strips make a level weave and even spacing, so measure each one against a ruler and trim the wide ones down. A strip a quarter inch narrower than its neighbor will still bake into a fine-looking pie, because the crimped rim covers the outer ends.
What is the easiest weaving pattern for a first pie?
The straight cross weave is the easiest: lay every other strip in one direction across the filling, fold those strips back, lay one strip across them, then unfold. That single cycle repeated is the whole pattern. Skip the diagonal and three-way designs for now. They look fancier and need more strips, which means more chances to tear something.
How do I keep the lattice strips from slipping while I weave?
Leave a generous overhang at the rim, at least an inch, so the strips rest on the pie plate rather than balanced on the filling. Lay them straight down instead of sliding them into place, and keep the spacing even so no strip ends up with nowhere to go. If everything moves at once, you have cut them too long for the dish.
Should I brush a lattice crust with egg wash or milk?
Both work. One egg beaten with a tablespoon of milk gives the deepest golden shine, heavy cream is the mess-free option and still browns well, and equal parts honey and water warmed in the microwave gives a softer gloss. Whichever you pick, brush before baking and add coarse sugar on top if you want sparkle and crunch.
How can I tell when a lattice pie crust is baked?
Look at three things: the strips are evenly golden on top and darker at the edges, the fruit has settled down from its mound instead of sitting high in the shell, and the juices bubble thickly when you nudge the dish. Clear or thin running juices mean more time, usually another 5 to 10 minutes. Then cool it 2 hours before cutting.
Conclusion
The sequence that produces a clean lattice is short: chill the dough, measure the strips, weave gently, seal the rim firmly, and vent through the gaps. Do those five things in that order and the weave takes about fifteen minutes on a chilled pie.
Before you start, make the filling and get it cold, chill the dough for at least half an hour, and clear a stretch of counter. Then make your first one with 4 to 6 wide strips. Once you know how to make a lattice pie crust for beginners, the second pie is the one you will make for every holiday after this.