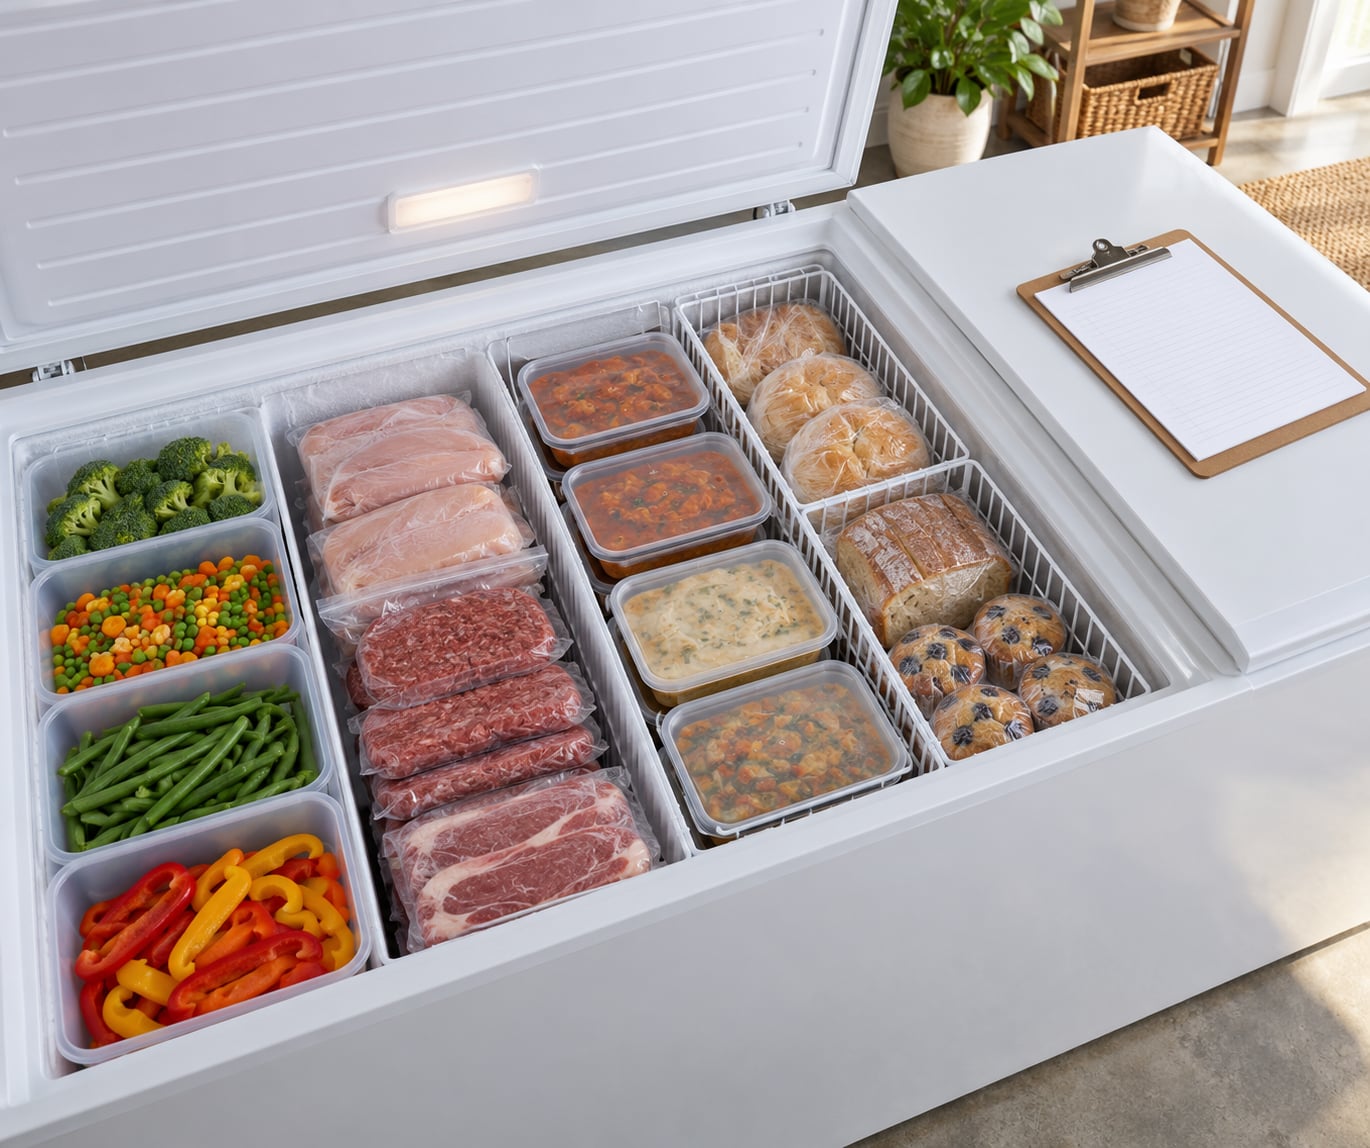
To organize a chest freezer so nothing gets lost, give every item a named zone, store each zone in a lift-out basket or crate you can pull out whole, label every container with its contents and freeze date, and keep a written inventory somewhere outside the freezer. Do it in six steps and the whole reset takes about an hour.
The reason chest freezers defeat people is their shape. A deep box with a lid means everything you put in slides to the bottom, and the bottom is where things disappear. Small bags of chopped peppers, a stray container of stock, one lonely package of hot dogs, all of it sinks and stays there until it turns white and dry.
A chest freezer also does not have shelves, so there is no natural order to it. Nothing tells you where the chicken is. You end up lifting the lid, moving three bags, and hoping. That is the whole problem, and it is a layout problem rather than a willpower problem.
The short version: an eat-first crate on top, category bins beneath it, one label on each bin, and a list on the fridge door that says what is inside.
Table of Contents
- What You Need
- Step-by-Step: How to Organize a Chest Freezer So Nothing Gets Lost
- 1. Empty the freezer and check the inventory
- 2. Measure the freezer and assign zones
- 3. Choose bins and containers that fit the zones
- 4. Label every category and package
- 5. Arrange food for visibility and airflow
- 6. Create a freezer inventory and monthly reset
- Common Mistakes
- Frequently Asked Questions
- How do I organize a chest freezer that is already full?
- What is the best way to label food in a chest freezer?
- Should I use bins or freezer bags in a chest freezer?
- How do I keep frozen foods organized without wasting space?
- How often should I update a chest freezer inventory?
- Can I stack food directly on top of other frozen food?
- Conclusion
What You Need

You do not need organizer products. You need containers that fit, something to write with, and a surface to write on. Everything else is a habit.
- Open-top bins or crates that fit your freezer’s inside width and depth, with room above them for the lid to close. Measure first.
- Two small crates or bins for the eat-first zone. These get pulled out most often.
- A permanent marker that writes on plastic, foil, and cardboard without smearing when it gets cold.
- Masking tape for cardboard boxes and bags, because it lifts cleanly later.
- A measuring tape, for checking that your bins actually clear the lid.
- A notebook, index card, or phone note that stays in the kitchen, not in the freezer.
- Two towels and a cooler if you are working in a garage in summer, so the food stays cold while you sort.
Budget an hour for a full reset on a mid-size chest freezer, and about twenty minutes a month to keep it working. If you have two freezers, plan two hours the first time.
Step-by-Step: How to Organize a Chest Freezer So Nothing Gets Lost
Six steps, in order. Do them in this sequence and the result holds for months.
1. Empty the freezer and check the inventory
Take everything out and put it into three piles: keep, cook first, and toss. The middle pile is the important one. Anything that has been sitting since a harvest or a bulk meat buy goes there, not back into the freezer.
Write a quick list as you go, grouping identical items into one line. Three bags of green beans become one line reading green beans, three bags. That single habit is what stops the list from turning into a wall of text you will never update.
Put warm food in only after it has cooled in the fridge for a few hours, and never in a container that is still warm. Loading a chest freezer with room-temperature food warms everything around it and costs you a day of chill.
You know this step worked when every item in the freezer appears on a sheet of paper and nothing is unaccounted for. Unaccounted-for food is exactly the problem you are solving.
2. Measure the freezer and assign zones

Measure the inside width, the inside depth, and the height from the floor to the underside of the lid. Write those three numbers on the inventory sheet. Any bin wider than the inside width will not go in, and this is where most people waste money.
Now assign fixed zones by position, top to bottom. Fixed positions matter more than clever categories, because a household learns a location in about a week and a category takes longer.
| Zone | What goes here | Container | Label placement |
|---|---|---|---|
| Top, zone A | Eat-first items and anything you will cook this month | One or two small crates | Front of the crate, facing up |
| Second, zone B | Meat, poultry, seafood, kept separate from produce | Deep bin or waxed cardboard box | Side of the bin |
| Third, zone C | Prepared meals, soups, cooked grains | Medium bin or boxes | Side of the bin |
| Bottom, zone D | Bread, dough, baked goods, treats | Flat box or bin | Side of the bin |
| Bottom, zone E | Vegetables, fruit, single bags that sink | Wire baskets or crates | Front of each basket |
Keep raw meat in its own zone. If a power outage or a spill happens, the damage is limited to one container instead of the whole freezer.
3. Choose bins and containers that fit the zones
Match the container to the job. Wire baskets are best for small loose bags because you can see and lift them individually. Rigid bins are best for grouped categories because they stack and stay put. Freezer bags are best for flattened items and for portion control, provided you write directly on the bag with a permanent marker.
Waxed cardboard boxes made for fridge and freezer use beat thin plastic in a chest freezer. The wax coating survives moisture, they are cheap, and they take a label well. Thin-walled plastic bins, the kind sold in bulk for craft storage, crack or shatter when you lift a frozen solid load out of a cold garage.
Avoid anything with a low front and a high back. Those are built for cabinets, and the contents slide out over the edge the moment you pick it up in a chest freezer. Also skip unlined single-wall cardboard, which turns to pulp within weeks of condensation.
Leave two to three inches of clearance between the top of your tallest bin and the lid. A freezer packed flush with the lid is a freezer that dumps its top layer across the floor every time the door swings.
4. Label every category and package
Use one format everywhere so anyone in the house can read it without asking. Write four things: the food name, the date frozen, the quantity, and where it came from if that matters, such as a bulk buy or a specific harvest.
Example: Chopped bell peppers, 8 bags, frozen Aug 14, Zone E. The date is the part people skip, and it is the part that decides whether you eat a bag or throw it out. A permanent marker on plastic is hard to beat. A printed label maker sticker also lasts, but it costs more and the adhesive is a weak point on some plastic.
On cardboard, use masking tape. On loose freezer bags, write straight onto the bag with a marker, because tape peels off a frosted surface and the bag slides out of the basket anyway.
Label the bin, not just the food. One label on the front of the crate tells you the zone at a glance from above, which is how you will actually look for it.
5. Arrange food for visibility and airflow
Fill the bottom zone first, then work upward, and leave a shallow top layer. Deep, solid containers go low where the weight is easy to support. Frequently used items go in the top crate so you never dig.
Stand bags on their edges inside a wire basket instead of piling them flat. Frozen bags fuse into a brick when stacked flat, and you can only pull the top one out without thawing the rest. Standing them also lets cold air move between them.
Use first in, first out. New packages go behind or under older ones in the same bin, so the oldest package is always the one you reach first. In the eat-first crate, put the newest item at the bottom and the oldest on top, which means the thing you need to cook next is the thing you grab first.
Leave gaps. Cold air circulates around food, and a freezer packed solid with no space holds its temperature worse and burns food faster.
6. Create a freezer inventory and monthly reset
The inventory is the part that separates a system from a one-time tidy. Keep it outside the freezer, on the fridge door or in a drawer, and update it every time you add or remove food. A phone note works if everyone in the house can see it. A dry erase board on the wall works if your household is used to writing on things.
| Item | Quantity | Date frozen | Zone | Notes |
|---|---|---|---|---|
| Ground beef, 80/20 | 10 packages | Aug 14 | B | Cook first |
| Chopped bell peppers | 8 bags | Aug 20 | E | Garden |
| Chicken thighs | 4 packages | Sep 02 | B | Use by month end |
| Soup, batch of 6 | 6 containers | Sep 08 | C | Eat first |
| Bread, sourdough | 3 loaves | Sep 10 | D | Slice before freezing |
Fill this in as you sort, then set a ten-minute monthly reset. Check the eat-first crate, move anything dated older than a few months up, toss what nobody will claim, and rewrite the lines that changed. A bag nobody has claimed twice goes in a discard bin on the counter rather than back in the freezer.
If a bulk harvest or bulk meat buy doubles your stock, do not add a new category. Add a second container to the existing zone, give it the same label format, and add one line to the inventory. Re-zoning from scratch is what turns a two-hour job into an abandoned one.
Common Mistakes
Packing the top layer flush with the lid. Contents slide out every time the lid opens. Keep the top layer shallow and leave a few inches of clearance.
Storing small bags loose. They sink to the floor and vanish. Corral them in wire baskets or a long narrow bin so they stay visible and liftable.
Stacking bags flat in a pile. Frozen bags fuse into one block and only the top one is reachable. Stand them on edge instead.
Mystery containers with no label. Nobody can identify them, so nobody eats them, so they burn. Label the bin at minimum, and date it.
Skipping the date. Without a freeze date you cannot judge quality, and you will hold food far longer than it deserves.
Buying bins before measuring. Measure the inside width and depth first. A bin that does not clear the lid is a bin that does not get used.
Packing the freezer solid. Cold air needs room to move. Leave space between containers and along the walls.
Burial without rotation. New food goes in front of or under old food, not on top of it. Without rotation, the oldest items are always at the bottom.
One person running the system. If only the organizer knows where things go, it collapses within weeks. Post the zone map on the wall where the freezer is, and say out loud that new food goes on the list.
Frequently Asked Questions
How do I organize a chest freezer that is already full?
Work in one quadrant at a time instead of emptying everything. Pull out one corner, sort it into keep, cook first, and toss, and rebuild that corner in its zone with a labeled bin. Do the next corner once you finish the first. Most people find that two-thirds of a full freezer holds about a quarter of the food they thought it did.
What is the best way to label food in a chest freezer?
Write on the container front with a permanent marker, not on masking tape stuck to a bag. Include four things: food name, date frozen, quantity, and zone letter. Use the same format on every container so anyone in the house can read it without asking. Masking tape works well on cardboard boxes but peels off frosted plastic and bag surfaces.
Should I use bins or freezer bags in a chest freezer?
Use both, for different jobs. Rigid bins hold grouped categories and stay put when you lift them out. Freezer bags suit single items, flattened foods like berries or bread, and portion control, as long as you write on the bag itself. Avoid thin-walled plastic bins, which crack when you lift a frozen solid load, and avoid bags piled flat, which freeze into a block.
How do I keep frozen foods organized without wasting space?
Use lift-out containers sized to your freezer rather than stacking loose items, and add a false floor only if you measured and left clearance under the lid. Leave a few inches of space above the top layer so the lid closes and cold air circulates. Fill the top crate with what you will eat first so you are not digging through everything to find it.
How often should I update a chest freezer inventory?
Once a month is enough for most households, and ten minutes covers a mid-size chest freezer. Check the eat-first crate, move anything dated over a couple of months upward, discard what nobody claims, and rewrite the changed lines. Update the list immediately after any bulk buy or harvest, since that is when the count drifts fastest.
Can I stack food directly on top of other frozen food?
You can, but avoid making it the default. Unstackaged food slides toward the bottom when you move anything above it, and stacked bags freeze into a single block where only the top package is reachable. Store foods in bins, crates, or baskets with open tops and lift them out whole, standing bags on edge inside a basket so air moves around them.
Conclusion
Start with the measurement and the zone map. Once you know the inside width, depth, and height, write five zones on your inventory sheet and label five bins to match them. Everything after that is the ten-minute monthly check.
Three habits do the heavy lifting: a crate on top holding what you will eat first, a label on every bin with a date, and a list kept outside the freezer. Fix those and nothing gets lost, because you never have to search in the first place.